在设备上运行
本文档贡献者:sunnylqm(88.29%), 3430453046(11.71%)
在真机上测试 app 后再将其发布给用户总是好的。本文档将指导你通过必须的步骤在设备上运行 React Native app,为生产做准备。
如果使用 Create React Native App 来建立工程,可以通过 Expo App 扫描 QR 代码在设备上预览 app。为了在设备上编译和运行 app,需要逐出并从搭建开发环境安装原生代码依赖。
- iOS
- Android
在 iOS 设备上运行应用
在 Android 设备上运行应用
A Mac is required in order to build your app for iOS devices. Alternatively, you can refer to the Quick Start instructions to learn how to build your app using Create React Native App, which will allow you to run your app using the Expo client app.
1. 通过 USB 数据线连接设备
使用 USB 闪电数据线连接 iOS 设备到 Mac。导航到工程的ios文件夹,然后用 Xcode 打开.xcodeproj文件,如果使用 CocoaPods 打开.xcworkspace。
如果这是第一次在 iOS 设备上运行 app,需要注册开发设备。从 Xcode 菜单栏打开Product菜单,然后前往Destination。从列表中查找并选择设备。Xcode 将注册为开发设备。
2. 配置代码签名
如果没有Apple developer account,先注册。
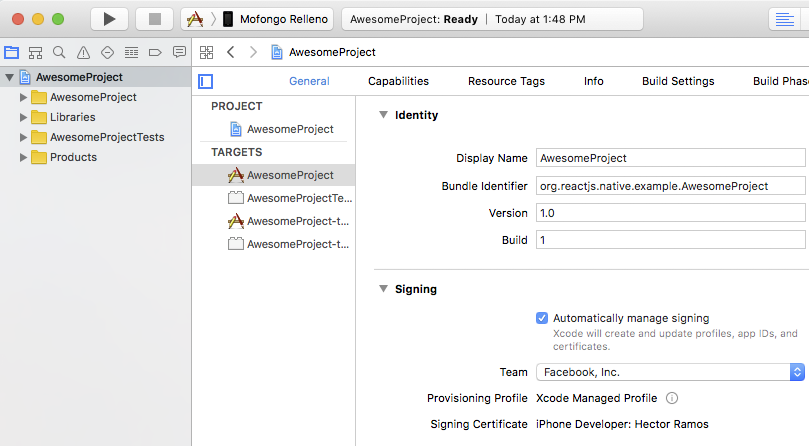
在 Xcode Project 导航中选择 project,然后选择 main target(它应该和 project 共享同样的名字)。查找"General"标签。前往"Signing"并确保在"Team"下拉下选择了开发者账号或团队。tests target(以 Tests 结尾,在 main target 下面)也需要重复同样的操作。
3. 编译并运行应用
如果一切设置正确,设备会在 Xcode toolbar 中被列为 build target,也会出现在设备面板里(⇧⌘2)。现在可以按下 Build and run 按钮(⌘R)或从Product菜单中选择Run。app 会立刻启动在设备上。

If you run into any issues, please take a look at Apple's Launching Your App on a Device docs.
下文所指的设备包括 Android 手机和模拟器。
1. 开启 USB 调试
在默认情况下 Android 设备只能从应用市场来安装应用。你需要开启 USB 调试才能自由安装开发版本的 APP。
首先,确定你已经打开设备的 USB 调试开关。
2. 通过 USB 数据线连接设备
Let's now set up an Android device to run our React Native projects. Go ahead and plug in your device via USB to your development machine.
然后使用lsusb来查看制造商代码(在 mac 上则必须先安装 lsusb)。这一命令的运行结果看起来是这样的:
$ lsusb
Bus 002 Device 002: ID 8087:0024 Intel Corp. Integrated Rate Matching Hub
Bus 002 Device 001: ID 1d6b:0002 Linux Foundation 2.0 root hub
Bus 001 Device 003: ID 22b8:2e76 Motorola PCS
Bus 001 Device 002: ID 8087:0024 Intel Corp. Integrated Rate Matching Hub
Bus 001 Device 001: ID 1d6b:0002 Linux Foundation 2.0 root hub
Bus 004 Device 001: ID 1d6b:0003 Linux Foundation 3.0 root hub
Bus 003 Device 001: ID 1d6b:0002 Linux Foundation 2.0 root hub
以上这些行代码代表了目前连接在你电脑上的 USB 设备。
那么如何找到代表你的手机的那一行呢?此时试着拔掉你的手机,再运行这一命令:
$ lsusb
Bus 002 Device 002: ID 8087:0024 Intel Corp. Integrated Rate Matching Hub
Bus 002 Device 001: ID 1d6b:0002 Linux Foundation 2.0 root hub
Bus 001 Device 002: ID 8087:0024 Intel Corp. Integrated Rate Matching Hub
Bus 001 Device 001: ID 1d6b:0002 Linux Foundation 2.0 root hub
Bus 004 Device 001: ID 1d6b:0003 Linux Foundation 3.0 root hub
Bus 003 Device 001: ID 1d6b:0002 Linux Foundation 2.0 root hub
可以看到在拔掉手机之后,对应的那一行就不见了(上面这个例子里是"Motorola PCS")。那就是我们要找的。
Bus 001 Device 003: ID 22b8:2e76 Motorola PCS
上面这一行里,我们需要的是设备 ID 中的前四个字符:
22b8:2e76
也就是22b8—— 对应的就是 Motorola。
你需要把这个写入 udev rule 才能正常使用:
echo 'SUBSYSTEM=="usb", ATTR{idVendor}=="22b8", MODE="0666", GROUP="plugdev"' | sudo tee /etc/udev/rules.d/51-android-usb.rules
记得把上面的22b8替换为你的设备的制造商代码。
下面检查你的设备是否能正确连接到 ADB(Android Debug Bridge),使用adb devices命令:
$ adb devices
List of devices attached
emulator-5554 offline   # Google emulator
14ed2fcc device         # Physical device
在右边那列看到device说明你的设备已经被正确连接了。注意,你每次只应当连接一个设备。
译注:如果你连接了多个设备(包含模拟器在内),后续的一些操作可能会失败。拔掉不需要的设备,或者关掉模拟器,确保 adb devices 的输出只有一个是连接状态。
3. 运行应用
现在你可以运行npx react-native run-android来在设备上安装并启动应用了。
If you get a "bridge configuration isn't available" error, see Using adb reverse.
提示
你还可以运行
npx react-native run-android --variant=release来安装 release 版的应用。当然你需要先配置好签名,且此时无法再开启开发者菜单。注意在 debug 和 release 版本间来回切换安装时可能会报错签名不匹配,此时需要先卸载前一个版本再尝试安装。
从设备上访问开发服务器
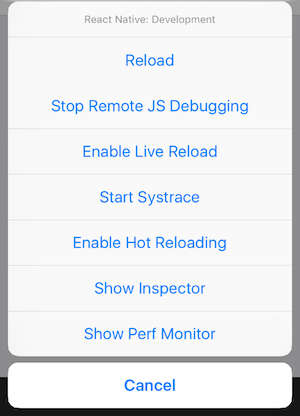
在启用开发服务器的情况下,你可以快速的迭代修改应用,然后在设备上立即查看结果。只需要在和电脑同样的 Wi-Fi 网络。摇晃设备打开Developer menu,然后 enable Live Reload。当 JavaScript 代码改变时 app 会重载。
常见问题
If you have any issues, ensure that your Mac and device are on the same network and can reach each other. Many open wireless networks with captive portals are configured to prevent devices from reaching other devices on the network. You may use your device's Personal Hotspot feature in this case.
当尝试连接到开发服务器时,可能得到一个红屏报错说:
Connection to http://localhost:8081/debugger-proxy?role=client timed out. Are you running node proxy? If you are running on the device, check if you have the right IP address in
RCTWebSocketExecutor.m.
解决这个问题检查以下几点。
1. Wi-Fi 网络
确保笔记本电脑和电话在同一个Wi-Fi 网络。
2. IP 地址
确保编译脚本正确检测到机器的 IP 地址(e.g. 10.0.1.123)。
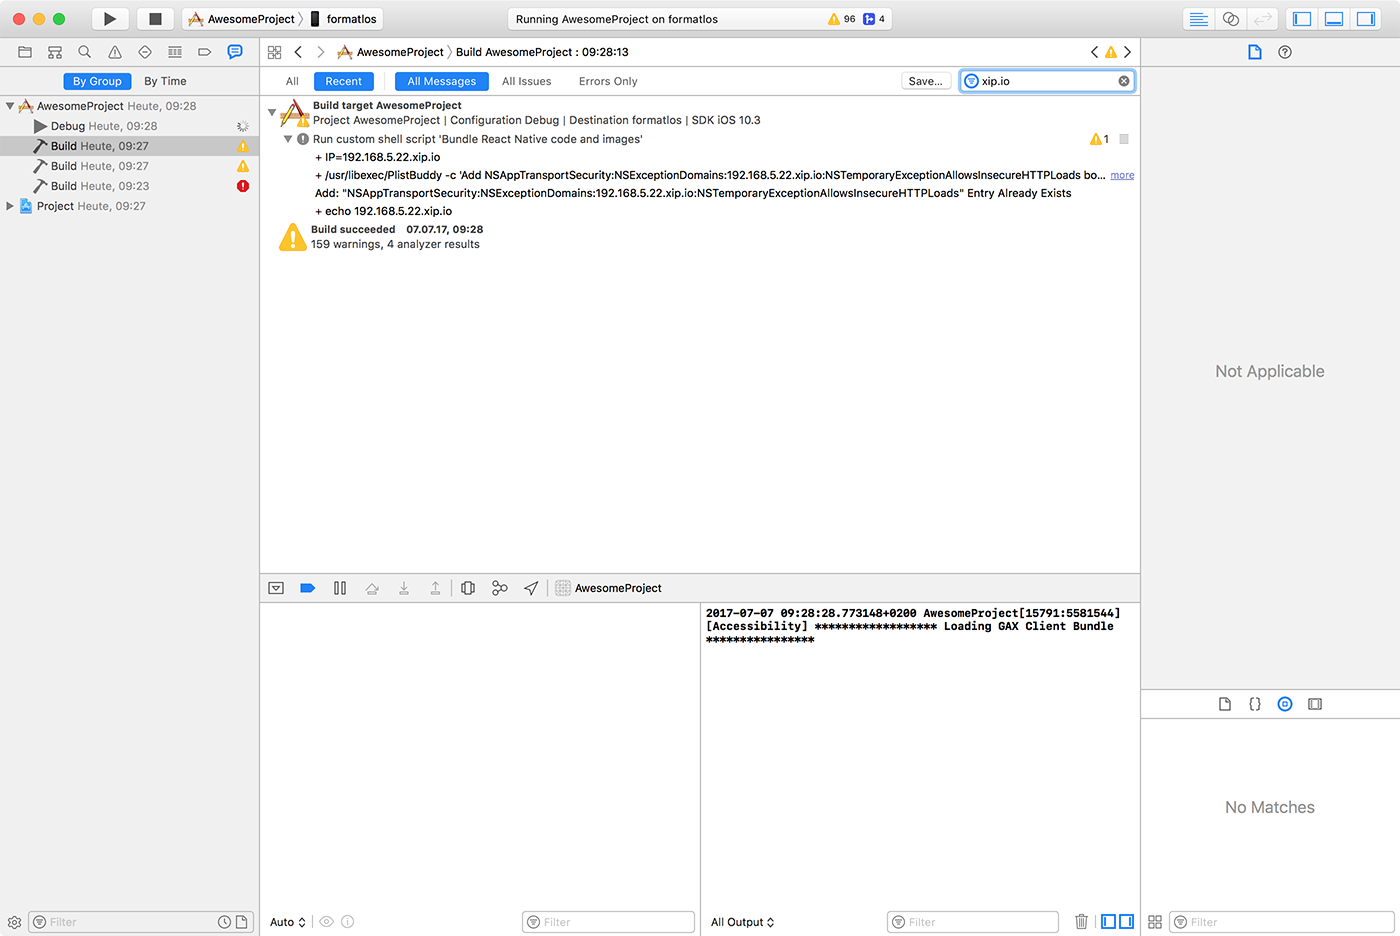
打开Report navigator标签,选择最近的Build然后搜索xip.io。这个内嵌到 app 的 IP 地址应该匹配机器 IP 地址加上域名 .xip.io(例如 10.0.1.123.xip.io)
3. 网络/路由配置
React Native 使用通配符 DNS 服务 xip.io 处理设备,用 IP 地址代替域名作为 Apple ATS 禁止 URLs,开发者的网络通常不是建立来解析本地主机名的。一些有安全特性的路由器阻止 DNS 服务器在本地 IP 范围内解析任何东西。
通过运行nsloop检查能否解析 xip.io 地址。
$ nslookup 10.0.1.123.xip.io
If it doesn't resolve your local IP address either the xip.io service is down or more likely your router prevents it. 如果不能解析本地 IP 地址,则xip.io服务器下了或可能是路由器阻止了它。
To still use xip.io behind your router:
用 Google DNS (8.8.8.8) 配置电话
禁用路由器中适当的安全特性
从设备上访问开发服务器
在启用开发服务器(官方名称 metro,但我们更常称之为 Packager)的情况下,你可以快速的迭代修改应用,然后在设备上立即查看结果。按照下面描述的任意一种方法来使你的设备可以访问到运行在电脑上的开发服务器。
译注:默认情况下模拟器可以自动探测宿主机 ip 并连接,只有 Android 5.0 以下版本的手机需要按下文说明来手动操作。但某些情形下可能也无法正常连接,请注意去讨论区查看是否有人遭遇同类型的问题(不同时期不同版本可能是不同的问题)。有些文章会提到
react-native bundle命令,这个命令会把 js 文件打包内置到应用中,从而不需要连接 Packager,但这并没有解决问题。我们在开发中必须使用到 Packager,否则无法刷新代码。
(Android 5.0 及以上)使用 adb reverse 命令
注意,这个选项只能在 5.0 以上版本(API 21+)的安卓设备上使用。
首先把你的设备通过 USB 数据线连接到电脑上,并开启 USB 调试(关于如何开启 USB 调试,参见上面的章节)。
- 运行
adb reverse tcp:8081 tcp:8081 - 不需要更多配置,你就可以使用
Reload JS和其它的开发选项了。
(Android 5.0 以下)通过 Wi-Fi 连接你的本地开发服务器
You can also connect to the development server over Wi-Fi. You'll first need to install the app on your device using a USB cable, but once that has been done you can debug wirelessly by following these instructions. You'll need your development machine's current IP address before proceeding.
You can find the IP address in System Preferences → Network.
Open the command prompt and type ipconfig to find your machine's IP address (more info).
Open a terminal and type /sbin/ifconfig to find your machine's IP address.
- 首先确保你的电脑和手机设备在同一个 Wi-Fi 环境下。
- 在设备上运行你的 React Native 应用。和打开其它 App 一样操作。
- 你应该会看到一个“红屏”错误提示。这是正常的,下面的步骤会解决这个报错。
- 摇晃设备,或者运行
adb shell input keyevent 82,可以打开开发者菜单。 - 点击
Dev Settings->Debug server host for device。 - 输入你电脑的 IP 地址和端口号(譬如 10.0.1.1:8081)。在 Mac 上,你可以在系统设置/网络里找查询你的 IP 地址。在 Windows 上,打开命令提示符并输入
ipconfig来查询你的 IP 地址。在 Linux 上你可以在终端中输入ifconfig来查询你的 IP 地址。 - 回到开发者菜单然后选择
Reload JS。
You can now enable Live reloading from the Developer menu. Your app will reload whenever your JavaScript code has changed.
为生产编译 app
已经用 React Native 编译了一个伟大的 app,现在渴望在 App Store 发布。其过程和任何其它原生 iOS app 一样,有一些额外的注意事项要考虑。
1. Enable App Transport Security
App Transport Security 是 iOS 9 引入的一项安全特性,拒绝不通过 HTTPS 发送的所有 HTTP 请求。这会导致 HTTP 传输阻塞,包括开发者 React Native 服务器。为了使开发容易,在 React Native projects 里 ATS 默认为localhost禁用。
You should re-enable ATS prior to building your app for production by removing the localhost entry from the NSExceptionDomains dictionary in your Info.plist file in the ios/ folder. You can also re-enable ATS from within Xcode by opening your target properties under the Info pane and editing the App Transport Security Settings entry.
If your application needs to access HTTP resources on production, see this post to learn how to configure ATS on your project.
2. 配置 release scheme
需要在 Xcode 使用Release scheme 编译在 App Store 发布的 app。Release版本的应用会自动禁用开发者菜单,同时也会将 js 文件和静态图片打包压缩后内置到包中,这样应用可以在本地读取而无需访问开发服务器(同时这样一来你也无法再调试,需要调试请将 Buiid Configuration 再改为 debug)。
由于发布版本已经内置了 js 文件,因而也无法再通过开发服务器来实时更新。面向用户的热更新,请使用专门的热更新服务。
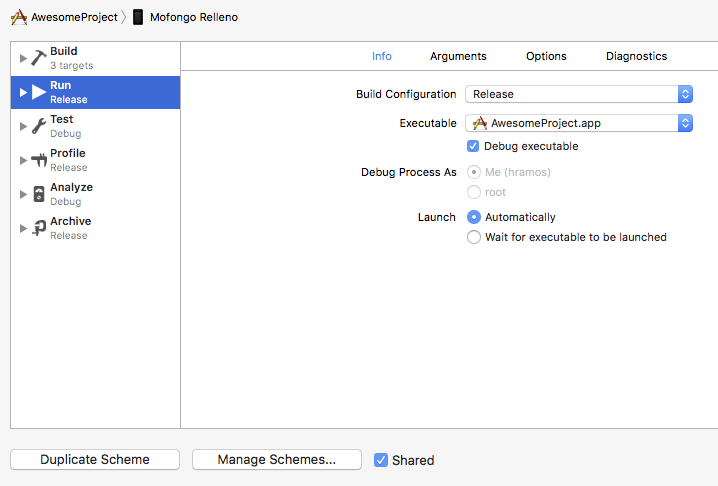
要配置 app 为使用Release scheme 编译,请前往Product → Scheme → Edit Scheme。选择侧边栏的Run标签,然后设置下拉的 Build Configuration 为Release。
关于启动屏的优化技巧
随着 App 包大小的增长,可能开始在启动屏(splash)和根应用视图显示之间看到白屏闪现。如果是这样,为了在转换期间保持启动屏显示,可以添加下列代码到AppDelegate.m。
  // Place this code after "[self.window makeKeyAndVisible]" and before "return YES;"
  UIView* launchScreenView = [[[NSBundle mainBundle] loadNibNamed:@"LaunchScreen" owner:self options:nil] objectAtIndex:0];
  launchScreenView.frame = self.window.bounds;
  rootView.loadingView = launchScreenView;
The static bundle is built every time you target a physical device, even in Debug. If you want to save time, turn off bundle generation in Debug by adding the following to your shell script in the Xcode Build Phase Bundle React Native code and images:
 if [ "${CONFIGURATION}" == "Debug" ]; then
  export SKIP_BUNDLING=true
 fi
3. 编译发布 app
现在可以通过点击⌘B或从菜单栏选择 Product → Build 编译发布 app。一旦编译发布,就能够向 beta 测试者发布 app,提交 app 到 App Store。
You can also use the
React Native CLIto perform this operation using the option--configurationwith the valueRelease(e.g.npx react-native run-ios --configuration Release).
Building your app for production
You have built a great app using React Native, and you are now itching to release it in the Play Store. The process is the same as any other native Android app, with some additional considerations to take into account. Follow the guide for generating a signed APK to learn more.