
Mocha 是一个能够运行在 Node.js 和浏览器中的多功能 JavaScript 测试框架,它让异步测试变得 简单 和 有趣。Mocha 顺序运行测试,并给出灵活而精确的报告,同时能够将未捕获的异常映射到准确的测试用例上。Mocha 源码托管在 GitHub 上。
# Backers
Find Mocha helpful? Become a backer and support Mocha with a monthly donation.
![]()
![]()
![]()
![]()
![]()
![]()
![]()
![]()
![]()
![]()
![]()
![]()
![]()
![]()
![]()
![]()
![]()
![]()
![]()
![]()
![]()
![]()
![]()
![]()
![]()
![]()
![]()
![]()
![]()
![]()
# Sponsors
Use Mocha at Work? Ask your manager or marketing team if they'd help support our project. Your company's logo will also be displayed on npmjs.com and our GitHub repository.
![]()
![]()
![]()
![]()
![]()
![]()
![]()
![]()
![]()
![]()
![]()
![]()
![]()
![]()
![]()
![]()
# 特色
- browser support
- simple async support, including promises
- test coverage reporting
- string diff support
- javascript API for running tests
- proper exit status for CI support etc
- auto-detects and disables coloring for non-ttys
- maps uncaught exceptions to the correct test case
- async test timeout support
- test retry support
- test-specific timeouts
- Growl support
- reports test durations
- highlights slow tests
- file watcher support
- global variable leak detection
- optionally run tests that match a regexp
- auto-exit to prevent "hanging" with an active loop
- easily meta-generate suites & test-cases
- config file support
- mocha.opts file support
- clickable suite titles to filter test execution
- node debugger support
- detects multiple calls to
done() - use any assertion library you want
- extensible reporting, bundled with 9+ reporters
- extensible test DSLs or "interfaces"
- before, after, before each, after each hooks
- arbitrary transpiler support (coffee-script etc)
- TextMate bundle
# 目录
- 目录
- 安装
- 入门
- Run Cycle Overview
- Detects Multiple Calls to
done() - 断言
- 异步代码
- 异步代码
- 箭头函数
- Hooks
- Pending Tests
- Exclusive Tests
- Inclusive Tests
- Retry Tests
- Dynamically Generating Tests
- Timeouts
- Diffs
- Command-Line Usage
- Interfaces
- Reporters
- Running Mocha in the Browser
- Desktop Notification Support
- Configuring Mocha (Node.js)
mocha.optstest/目录- Error Codes
- Editor Plugins
- 实例
- 测试 Mocha
- 更多信息
# 安装
利用 npm 全局安装:
$ npm install --global mocha
或者作为开发依赖安装到项目中:
$ npm install --save-dev mocha
从 v7.0.0 版本开始,Mocha 仅支持 Node.js v8.0.0 或更新的版本。
# 入门
$ npm install mocha
$ mkdir test
$ $EDITOR test/test.js # or open with your favorite editor
在编辑器中输入:
var assert = require('assert');
describe('Array', function() {
  describe('#indexOf()', function() {
    it('should return -1 when the value is not present', function() {
      assert.equal([1, 2, 3].indexOf(4), -1);
    });
  });
});
回到命令行:
$ ./node_modules/mocha/bin/mocha

  Array
    #indexOf()
      ✓ should return -1 when the value is not present


  1 passing (9ms)
在 package.json 文件中设置 test 脚本:
"scripts": {
  "test": "mocha"
}
然后运行:
$ npm test
# Run Cycle Overview
A brief outline on the order Mocha's components are executed. Worth noting that all hooks, describe and it callbacks are run in the order they are defined (i.e. found in the file).
run 'mocha spec.js'
|
spawn child process
|
|--------------> inside child process
  process and apply options
  |
  run spec file/s
  |
  |--------------> per spec file
    suite callbacks (e.g., 'describe')
    |
    'before' root-level pre-hook
    |
    'before' pre-hook
    |
    |--------------> per test
      'beforeEach' root-level pre-hook
      |
      'beforeEach' pre-hook
      |
      test callbacks (e.g., 'it')
      |
      'afterEach' post-hook
      |
      'afterEach' root-level post-hook
    |<-------------- per test end
    |
    'after' post-hook
    |
    'after' root-level post-hooks
  |<-------------- per spec file end
|<-------------- inside child process end
# Detects Multiple Calls to done()
If you use callback-based async tests, Mocha will throw an error if done() is called multiple times. This is handy for catching accidental double callbacks.
it('double done', function(done) {
  // Calling `done()` twice is an error
  setImmediate(done);
  setImmediate(done);
});
Running the above test will give you the below error message:
$ ./node_modules/.bin/mocha mocha.test.js


  ✓ double done
  1) double done

  1 passing (6ms)
  1 failing

  1) double done:
     Error: done() called multiple times
      at Object.<anonymous> (mocha.test.js:1:63)
      at require (internal/module.js:11:18)
      at Array.forEach (<anonymous>)
      at startup (bootstrap_node.js:187:16)
      at bootstrap_node.js:608:3
# 断言
Mocha 允许你使用任何你喜欢的断言库。在上面的例子中,我们使用的是 Node.js 的内置 assert 模块 — 但是通常情况下,只要它能抛出 Error 就可以!这就意味着你可以使用下面列出的断言库:
- should.js - BDD style shown throughout these docs
- expect.js -
expect()风格的断言 - chai -
expect()、assert()和should风格的断言 - better-assert - C-style self-documenting
assert() - unexpected - "the extensible BDD assertion toolkit"
# 异步代码
Testing asynchronous code with Mocha could not be simpler! Simply invoke the callback when your test is complete. By adding a callback (usually named done) to it(), Mocha will know that it should wait for this function to be called to complete the test. This callback accepts both an Error instance (or subclass thereof) or a falsy value; anything else is invalid usage and throws an error (usually causing a failed test).
describe('User', function() {
  describe('#save()', function() {
    it('should save without error', function(done) {
      var user = new User('Luna');
      user.save(function(err) {
        if (err) done(err);
        else done();
      });
    });
  });
});
Alternatively, just use the done() callback directly (which will handle an error argument, if it exists):
describe('User', function() {
  describe('#save()', function() {
    it('should save without error', function(done) {
      var user = new User('Luna');
      user.save(done);
    });
  });
});
# Working with Promises
Alternately, instead of using the done() callback, you may return a Promise. This is useful if the APIs you are testing return promises instead of taking callbacks:
beforeEach(function() {
  return db.clear().then(function() {
    return db.save([tobi, loki, jane]);
  });
});

describe('#find()', function() {
  it('respond with matching records', function() {
    return db.find({type: 'User'}).should.eventually.have.length(3);
  });
});
The latter example uses Chai as Promised for fluent promise assertions.
In Mocha v3.0.0 and newer, returning a Promise and calling done() will result in an exception, as this is generally a mistake:
const assert = require('assert');

// antipattern
it('should complete this test', function(done) {
  return new Promise(function(resolve) {
    assert.ok(true);
    resolve();
  }).then(done);
});
The above test will fail with Error: Resolution method is overspecified. Specify a callback *or* return a Promise; not both.. In versions older than v3.0.0, the call to done() is effectively ignored.
# 使用 async / await
If your JS environment supports async / await, you can also write asynchronous tests like this:
beforeEach(async function() {
  await db.clear();
  await db.save([tobi, loki, jane]);
});

describe('#find()', function() {
  it('responds with matching records', async function() {
    const users = await db.find({type: 'User'});
    users.should.have.length(3);
  });
});
# 异步代码
When testing synchronous code, omit the callback and Mocha will automatically continue on to the next test.
describe('Array', function() {
  describe('#indexOf()', function() {
    it('should return -1 when the value is not present', function() {
      [1, 2, 3].indexOf(5).should.equal(-1);
      [1, 2, 3].indexOf(0).should.equal(-1);
    });
  });
});
# 箭头函数
Passing arrow functions (aka "lambdas") to Mocha is discouraged. Lambdas lexically bind this and cannot access the Mocha context. For example, the following code will fail:
describe('my suite', () => {
  it('my test', () => {
    // should set the timeout of this test to 1000 ms; instead will fail
    this.timeout(1000);
    assert.ok(true);
  });
});
If you do not need to use Mocha's context, lambdas should work. However, the result will be more difficult to refactor if the need eventually arises.
# Hooks
With its default "BDD"-style interface, Mocha provides the hooks before(), after(), beforeEach(), and afterEach(). These should be used to set up preconditions and clean up after your tests.
describe('hooks', function() {
  before(function() {
    // runs before all tests in this block
  });

  after(function() {
    // runs after all tests in this block
  });

  beforeEach(function() {
    // runs before each test in this block
  });

  afterEach(function() {
    // runs after each test in this block
  });

  // test cases
});
Tests can appear before, after, or interspersed with your hooks. Hooks will run in the order they are defined, as appropriate; all
before()hooks run (once), then anybeforeEach()hooks, tests, anyafterEach()hooks, and finallyafter()hooks (once).
# Describing Hooks
Any hook can be invoked with an optional description, making it easier to pinpoint errors in your tests. If a hook is given a named function, that name will be used if no description is supplied.
beforeEach(function() {
  // beforeEach hook
});

beforeEach(function namedFun() {
  // beforeEach:namedFun
});

beforeEach('some description', function() {
  // beforeEach:some description
});
# Asynchronous Hooks
All hooks (before(), after(), beforeEach(), afterEach()) may be sync or async as well, behaving much like a regular test-case. For example, you may wish to populate database with dummy content before each test:
describe('Connection', function() {
  var db = new Connection(),
    tobi = new User('tobi'),
    loki = new User('loki'),
    jane = new User('jane');

  beforeEach(function(done) {
    db.clear(function(err) {
      if (err) return done(err);
      db.save([tobi, loki, jane], done);
    });
  });

  describe('#find()', function() {
    it('respond with matching records', function(done) {
      db.find({type: 'User'}, function(err, res) {
        if (err) return done(err);
        res.should.have.length(3);
        done();
      });
    });
  });
});
# Root-Level Hooks
You may also pick any file and add "root"-level hooks. For example, add beforeEach() outside of all describe() blocks. This will cause the callback to beforeEach() to run before any test case, regardless of the file it lives in (this is because Mocha has an implied describe() block, called the "root suite").
beforeEach(function() {
  console.log('before every test in every file');
});
# Delayed Root Suite
If you need to perform asynchronous operations before any of your suites are run, you may delay the root suite. Run mocha with the --delay flag. This will attach a special callback function, run(), to the global context:
setTimeout(function() {
  // do some setup

  describe('my suite', function() {
    // ...
  });

  run();
}, 5000);
# Pending Tests
"Pending"--as in "someone should write these test cases eventually"--test-cases are simply those without a callback:
describe('Array', function() {
  describe('#indexOf()', function() {
    // pending test below
    it('should return -1 when the value is not present');
  });
});
Pending tests will be included in the test results, and marked as pending. A pending test is not considered a failed test.
# Exclusive Tests
The exclusivity feature allows you to run only the specified suite or test-case by appending .only() to the function. Here's an example of executing only a particular suite:
describe('Array', function() {
  describe.only('#indexOf()', function() {
    // ...
  });
});
Note: All nested suites will still be executed.
Here's an example of executing an individual test case:
describe('Array', function() {
  describe('#indexOf()', function() {
    it.only('should return -1 unless present', function() {
      // ...
    });

    it('should return the index when present', function() {
      // ...
    });
  });
});
Previous to v3.0.0, .only() used string matching to decide which tests to execute; this is no longer the case. In v3.0.0 or newer, .only() can be used multiple times to define a subset of tests to run:
describe('Array', function() {
  describe('#indexOf()', function() {
    it.only('should return -1 unless present', function() {
      // this test will be run
    });

    it.only('should return the index when present', function() {
      // this test will also be run
    });

    it('should return -1 if called with a non-Array context', function() {
      // this test will not be run
    });
  });
});
You may also choose multiple suites:
describe('Array', function() {
  describe.only('#indexOf()', function() {
    it('should return -1 unless present', function() {
      // this test will be run
    });

    it('should return the index when present', function() {
      // this test will also be run
    });
  });

  describe.only('#concat()', function() {
    it('should return a new Array', function() {
      // this test will also be run
    });
  });

  describe('#slice()', function() {
    it('should return a new Array', function() {
      // this test will not be run
    });
  });
});
But tests will have precedence:
describe('Array', function() {
  describe.only('#indexOf()', function() {
    it.only('should return -1 unless present', function() {
      // this test will be run
    });

    it('should return the index when present', function() {
      // this test will not be run
    });
  });
});
Note: Hooks, if present, will still be executed.
Be mindful not to commit usages of
.only()to version control, unless you really mean it! To do so one can run mocha with the option--forbid-onlyin the continuous integration test command (or in a git precommit hook).
# Inclusive Tests
This feature is the inverse of .only(). By appending .skip(), you may tell Mocha to simply ignore test case(s). Anything skipped will be marked as pending, and reported as such. Here's an example of skipping an individual test:
describe('Array', function() {
  describe('#indexOf()', function() {
    it.skip('should return -1 unless present', function() {
      // this test will not be run
    });

    it('should return the index when present', function() {
      // this test will be run
    });
  });
});
You can also put .skip() on an entire suite. This is equivalent to appending .skip() onto all tests in the suite. Hooks in the suite are also skipped.
describe('Array', function() {
  describe.skip('#indexOf()', function() {
    it('should return -1 unless present', function() {
      // this test will not be run
    });
  });
});
Note: Code in skipped suites, that is placed outside of hooks or tests is still executed, as mocha will still invoke the suite function to build up the suite structure for visualization.
Best practice: Use
.skip()instead of commenting tests out.
You may also skip at runtime using this.skip(). If a test needs an environment or configuration which cannot be detected beforehand, a runtime skip is appropriate. For example:
it('should only test in the correct environment', function() {
  if (/* check test environment */) {
    // make assertions
  } else {
    this.skip();
  }
});
The above test will be reported as pending. It's also important to note that calling this.skip() will effectively abort the test.
Best practice: To avoid confusion, do not execute further instructions in a test or hook after calling
this.skip().
Contrast the above test with the following code:
it('should only test in the correct environment', function() {
  if (/* check test environment */) {
    // make assertions
  } else {
    // do nothing
  }
});
Because this test does nothing, it will be reported as passing.
Best practice: Don't do nothing! A test should make an assertion or use
this.skip().
To skip multiple tests in this manner, use this.skip() in a "before all" hook:
before(function() {
  if (/* check test environment */) {
    // setup code
  } else {
    this.skip();
  }
});
This will skip all it, beforeEach/afterEach, and describe blocks within the suite. before/after hooks are skipped unless they are defined at the same level as the hook containing this.skip().
describe('outer', function() {
  before(function() {
    this.skip();
  });

  after(function() {
    // will be executed
  });

  describe('inner', function() {
    before(function() {
      // will be skipped
    });

    after(function() {
      // will be skipped
    });
  });
});
Updated in v7.0.0. Skipping a test within an "after all" hook is disallowed and will throw an exception. Use a return statement or other means to abort hook execution.
Before Mocha v3.0.0, this.skip() was not supported in asynchronous tests and hooks.
# Retry Tests
You can choose to retry failed tests up to a certain number of times. This feature is designed to handle end-to-end tests (functional tests/Selenium...) where resources cannot be easily mocked/stubbed. It's not recommended to use this feature for unit tests.
This feature does re-run beforeEach/afterEach hooks but not before/after hooks.
NOTE: Example below was written using Selenium webdriver (which overwrites global Mocha hooks for Promise chain).
describe('retries', function() {
  // Retry all tests in this suite up to 4 times
  this.retries(4);

  beforeEach(function() {
    browser.get('http://www.yahoo.com');
  });

  it('should succeed on the 3rd try', function() {
    // Specify this test to only retry up to 2 times
    this.retries(2);
    expect($('.foo').isDisplayed()).to.eventually.be.true;
  });
});
# Dynamically Generating Tests
Given Mocha's use of Function.prototype.call and function expressions to define suites and test cases, it's straightforward to generate your tests dynamically. No special syntax is required — plain ol' JavaScript can be used to achieve functionality similar to "parameterized" tests, which you may have seen in other frameworks.
Take the following example:
var assert = require('chai').assert;

function add() {
  return Array.prototype.slice.call(arguments).reduce(function(prev, curr) {
    return prev + curr;
  }, 0);
}

describe('add()', function() {
  var tests = [
    {args: [1, 2], expected: 3},
    {args: [1, 2, 3], expected: 6},
    {args: [1, 2, 3, 4], expected: 10}
  ];

  tests.forEach(function(test) {
    it('correctly adds ' + test.args.length + ' args', function() {
      var res = add.apply(null, test.args);
      assert.equal(res, test.expected);
    });
  });
});
The above code will produce a suite with three specs:
$ mocha

  add()
    ✓ correctly adds 2 args
    ✓ correctly adds 3 args
    ✓ correctly adds 4 args
Test duration
Many reporters will display test duration and flag tests that are slow (default: 75ms), as shown here with the "spec" reporter:

There are three levels of test duration (depicted in the following image):
- FAST: Tests that run within half of the "slow" threshold will show the duration in green (if at all).
- NORMAL: Tests that run exceeding half of the threshold (but still within it) will show the duration in yellow.
- SLOW: Tests that run exceeding the threshold will show the duration in red.

To tweak what's considered "slow", you can use the slow() method:
describe('something slow', function() {
  this.slow(300000); // five minutes

  it('should take long enough for me to go make a sandwich', function() {
    // ...
  });
});
# Timeouts
# Suite-level
Suite-level timeouts may be applied to entire test "suites", or disabled via this.timeout(0). This will be inherited by all nested suites and test-cases that do not override the value.
describe('a suite of tests', function() {
  this.timeout(500);

  it('should take less than 500ms', function(done) {
    setTimeout(done, 300);
  });

  it('should take less than 500ms as well', function(done) {
    setTimeout(done, 250);
  });
});
# Test-level
Test-specific timeouts may also be applied, or the use of this.timeout(0) to disable timeouts all together:
it('should take less than 500ms', function(done) {
  this.timeout(500);
  setTimeout(done, 300);
});
# Hook-level
Hook-level timeouts may also be applied:
describe('a suite of tests', function() {
  beforeEach(function(done) {
    this.timeout(3000); // A very long environment setup.
    setTimeout(done, 2500);
  });
});
Again, use this.timeout(0) to disable the timeout for a hook.
In v3.0.0 or newer, a parameter passed to
this.timeout()greater than the maximum delay value will cause the timeout to be disabled.
# Diffs
Mocha supports the err.expected and err.actual properties of any thrown AssertionErrors from an assertion library. Mocha will attempt to display the difference between what was expected, and what the assertion actually saw. Here's an example of a "string" diff:

# Command-Line Usage
mocha [spec..]

Run tests with Mocha

Commands
  mocha inspect [spec..]  Run tests with Mocha                         [default]
  mocha init <path>       create a client-side Mocha setup at <path>

Rules & Behavior
  --allow-uncaught           Allow uncaught errors to propagate        [boolean]
  --async-only, -A           Require all tests to use a callback (async) or
                             return a Promise                          [boolean]
  --bail, -b                 Abort ("bail") after first test failure   [boolean]
  --check-leaks              Check for global variable leaks           [boolean]
  --delay                    Delay initial execution of root suite     [boolean]
  --exit                     Force Mocha to quit after tests complete  [boolean]
  --forbid-only              Fail if exclusive test(s) encountered     [boolean]
  --forbid-pending           Fail if pending test(s) encountered       [boolean]
  --global, --globals        List of allowed global variables            [array]
  --retries                  Retry failed tests this many times         [number]
  --slow, -s                 Specify "slow" test threshold (in milliseconds)
                                                          [string] [default: 75]
  --timeout, -t, --timeouts  Specify test timeout threshold (in milliseconds)
                                                        [string] [default: 2000]
  --ui, -u                   Specify user interface    [string] [default: "bdd"]

Reporting & Output
  --color, -c, --colors                     Force-enable color output  [boolean]
  --diff                                    Show diff on failure
                                                       [boolean] [default: true]
  --full-trace                              Display full stack traces  [boolean]
  --growl, -G                               Enable Growl notifications [boolean]
  --inline-diffs                            Display actual/expected differences
                                            inline within each string  [boolean]
  --reporter, -R                            Specify reporter to use
                                                      [string] [default: "spec"]
  --reporter-option, --reporter-options,    Reporter-specific options
  -O                                        (<k=v,[k1=v1,..]>)           [array]

Configuration
  --config   Path to config file           [string] [default: (nearest rc file)]
  --opts     Path to `mocha.opts` (DEPRECATED)
                                         [string] [default: "./test/mocha.opts"]
  --package  Path to package.json for config                            [string]

File Handling
  --extension          File extension(s) to load           [array] [default: js]
  --file               Specify file(s) to be loaded prior to root suite
                       execution                       [array] [default: (none)]
  --ignore, --exclude  Ignore file(s) or glob pattern(s)
                                                       [array] [default: (none)]
  --recursive          Look for tests in subdirectories                [boolean]
  --require, -r        Require module                  [array] [default: (none)]
  --sort, -S           Sort test files                                 [boolean]
  --watch, -w          Watch files in the current working directory for changes
                                                                       [boolean]
  --watch-files        List of paths or globs to watch                   [array]
  --watch-ignore       List of paths or globs to exclude from watching
                                      [array] [default: ["node_modules",".git"]]

Test Filters
  --fgrep, -f   Only run tests containing this string                   [string]
  --grep, -g    Only run tests matching this string or regexp           [string]
  --invert, -i  Inverts --grep and --fgrep matches                     [boolean]

Positional Arguments
  spec  One or more files, directories, or globs to test
                                                     [array] [default: ["test"]]

Other Options
  --help, -h         Show usage information & exit                     [boolean]
  --version, -V      Show version number & exit                        [boolean]
  --list-interfaces  List built-in user interfaces & exit              [boolean]
  --list-reporters   List built-in reporters & exit                    [boolean]

Mocha Resources
    Chat: https://gitter.im/mochajs/mocha
  GitHub: https://github.com/mochajs/mocha.git
    Docs: https://mochajs.org/
# --allow-uncaught
By default, Mocha will attempt to trap uncaught exceptions thrown from running tests and report these as test failures. Use --allow-uncaught to disable this behavior and allow uncaught exceptions to propagate. Will typically cause the process to crash.
This flag is useful when debugging particularly difficult-to-track exceptions.
# --async-only, -A
Enforce a rule that tests must be written in "async" style, meaning each test provides a done callback or returns a Promise. Non-compliant tests will be marked as failures.
# --bail, -b
Causes Mocha to stop running tests after the first test failure it encounters. Corresponding "after each" and "after all" hooks are executed for potential cleanup.
--bail does not imply --exit.
# --check-leaks
Use this option to have Mocha check for global variables that are leaked while running tests. Specify globals that are acceptable via the --global option (for example: --check-leaks --global jQuery --global MyLib).
# --compilers
--compilerswas removed in v6.0.0. See further explanation and workarounds.
# --exit
Updated in v4.0.0.
TL;DR: If your tests hang after an upgrade to Mocha v4.0.0 or newer, use --exit for a quick (though not necessarily recommended) fix.
Prior to version v4.0.0, by default, Mocha would force its own process to exit once it was finished executing all tests. This behavior enables a set of potential problems; it's indicative of tests (or fixtures, harnesses, code under test, etc.) which don't clean up after themselves properly. Ultimately, "dirty" tests can (but not always) lead to false positive or false negative results.
"Hanging" most often manifests itself if a server is still listening on a port, or a socket is still open, etc. It can also be something like a runaway setInterval(), or even an errant Promise that never fulfilled.
The default behavior in v4.0.0 (and newer) is --no-exit, where previously it was --exit.
The easiest way to "fix" the issue is to simply pass --exit to the Mocha process. It can be time-consuming to debug — because it's not always obvious where the problem is — but it is recommended to do so.
To ensure your tests aren't leaving messes around, here are some ideas to get started:
- See the Node.js guide to debugging
- Use the new
async_hooksAPI (example) - Try something like wtfnode
- Use
.onlyuntil you find the test that causes Mocha to hang
# --forbid-only
Enforce a rule that tests may not be exclusive (use of e.g., describe.only() or it.only() is disallowed).
--forbid-only causes Mocha to fail when an exclusive ("only'd") test or suite is encountered, and it will abort further test execution.
# --forbid-pending
Enforce a rule that tests may not be skipped (use of e.g., describe.skip(), it.skip(), or this.skip() anywhere is disallowed).
--forbid-pending causes Mocha to fail when a skipped ("pending") test or suite is encountered, and it will abort further test execution.
# --global <variable-name>
Updated in v6.0.0; the option is
--globaland--globalsis now an alias.
Define a global variable name. For example, suppose your app deliberately exposes a global named app and YUI, you may want to add --global app --global YUI.
--global accepts wildcards. You could do --global '*bar' and it would match foobar, barbar, etc. You can also simply pass in '*' to ignore all globals.
--global can accept a comma-delimited list; --global app,YUI is equivalent to --global app --global YUI.
By using this option in conjunction with --check-leaks, you can specify a whitelist of known global variables that you expect to leak into global scope.
# --retries <n>
Retries failed tests n times.
Mocha does not retry test failures by default.
# --slow <ms>, -s <ms>
Specify the "slow" test threshold in milliseconds. Mocha uses this to highlight test cases that are taking too long. "Slow" tests are not considered failures.
Note: A test that executes for half of the "slow" time will be highlighted in yellow with the default spec reporter; a test that executes for entire "slow" time will be highlighted in red.
# --timeout <ms>, -t <ms>
Update in v6.0.0:
--no-timeoutis implied when invoking Mocha using inspect flags. It is equivalent to--timeout 0.--timeout 99999999is no longer needed.
Specifies the test case timeout, defaulting to two (2) seconds (2000 milliseconds). Tests taking longer than this amount of time will be marked as failed.
To override you may pass the timeout in milliseconds, or a value with the s suffix, e.g., --timeout 2s and --timeout 2000 are equivalent.
To disable timeouts, use --no-timeout.
Note: synchronous (blocking) tests are also bound by the timeout, but they will not complete until the code stops blocking. Infinite loops will still be infinite loops!
# --ui <name>, -u <name>
The --ui option lets you specify the interface to use, defaulting to bdd.
# --color, -c, --colors
Updated in v6.0.0.
--colorsis now an alias for--color.
"Force" color output to be enabled, or alternatively force it to be disabled via --no-color. By default, Mocha uses the supports-color module to decide.
In some cases, color output will be explicitly suppressed by certain reporters outputting in a machine-readable format.
# --diff
When possible, show the difference between expected and actual values when an assertion failure is encountered.
This flag is unusual in that it defaults to true; use --no-diff to suppress Mocha's own diff output.
Some assertion libraries will supply their own diffs, in which case Mocha's will not be used, regardless of the default value.
Mocha's own diff output does not conform to any known standards, and is designed to be human-readable.
# --full-trace
Enable "full" stack traces. By default, Mocha attempts to distill stack traces into less noisy (though still useful) output.
This flag is helpful when debugging a suspected issue within Mocha or Node.js itself.
# --growl, -G
Enable Growl (or OS-level notifications where available).
Requires extra software to be installed; see the growl module's docs for more information.
# --inline-diffs
Enable "inline" diffs, an alternative output for diffing strings.
Useful when working with large strings.
Does nothing if an assertion library supplies its own diff output.
# --reporter <name>, -R <name>
Specify the reporter that will be used, defaulting to spec.
Allows use of third-party reporters. For example, mocha-lcov-reporter may be used with --reporter mocha-lcov-reporter after it has been installed.
# --reporter-option <option>, -O <option>, --reporter-options <option>
Updated in v6.0.0. Can be specified multiple times.
--reporter-optionsis now an alias for--reporter-option.
Provide options specific to a reporter in <key>=<value> format, e.g., --reporter tap --reporter-option tapVersion=13.
Not all reporters accept options.
Can be specified as a comma-delimited list.
# --config <path>
New in v6.0.0.
Specify an explicit path to a configuration file.
By default, Mocha will search for a config file if --config is not specified; use --no-config to suppress this behavior.
# --opts <path>
Deprecated.
Specify a path to mocha.opts.
By default, Mocha looks for a mocha.opts in test/mocha.opts; use --no-opts to suppress this behavior.
# --package <path>
New in v6.0.0.
Specify an explicit path to a package.json file (ostensibly containing configuration in a mocha property).
By default, Mocha looks for a package.json in the current working directory or nearest ancestor, and will use the first file found (regardless of whether it contains a mocha property); to suppress package.json lookup, use --no-package.
# --extension <ext>
Files having this extension will be considered test files. Defaults to js.
Specifying --extension will remove .js as a test file extension; use --extension js to re-add it. For example, to load .mjs and .js test files, you must supply --extension mjs --extension js.
The option can be given multiple times. The option accepts a comma-delimited list: --extension a,b is equivalent to --extension a --extension b
# --file <file|directory|glob>
Explicitly include a test file to be loaded before other test files. Multiple uses of --file are allowed, and will be loaded in order given.
Useful if you want to declare, for example, hooks to be run before every test across all other test files.
Files specified this way are not affected by --sort or --recursive.
Files specified in this way should contain one or more suites, tests or hooks. If this is not the case, consider --require instead.
# --ignore <file|directory|glob>, --exclude <file|directory|glob>,
Explicitly ignore (exclude) one or more test files, directories or globs (e.g., some/**/files*) that would otherwise be loaded.
Files specified using --file are not affected by this option.
Can be specified multiple times.
# --recursive
When looking for test files, recurse into subdirectories.
See --extension for defining which files are considered test files.
# --require <module>, -r <module>
Require a module before loading the user interface or test files. This is useful for:
- Test harnesses
- Assertion libraries that augment built-ins or global scope (such as should.js)
- Instant ECMAScript modules via esm
- Compilers such as Babel via @babel/register or TypeScript via ts-node (using
--require ts-node/register). See Babel or TypeScript working examples.
Modules required in this manner are expected to do work synchronously; Mocha won't wait for async tasks in a required module to finish.
Note you cannot use --require to set a global beforeEach() hook, for example — use --file instead, which allows you to specify an explicit order in which test files are loaded.
# --sort, -S
Sort test files (by absolute path) using Array.prototype.sort.
# --watch, -w
Rerun tests on file changes.
The --watch-files and --watch-ignore options can be used to control which files are watched for changes.
Tests may be rerun manually by typing ⓡ ⓢ ⏎ (same shortcut as nodemon).
# --watch-files <file|directory|glob>
New in v7.0.0
List of paths or globs to watch when --watch is set. If a file matching the given glob changes or is added or removed mocha will rerun all tests.
If the path is a directory all files and subdirectories will be watched.
By default all files in the current directory having one of the extensions provided by --extension and not contained in the node_modules or .git folders are watched.
The option can be given multiple times. The option accepts a comma-delimited list: --watch-files a,b is equivalent to --watch-files a --watch-files b
# --watch-ignore <file|directory|glob>
New in v7.0.0
List of paths or globs to exclude from watching. Defaults to node_modules and .git.
To exclude all files in a directory it is preferable to use foo/bar instead of foo/bar/**/*. The latter will still watch the directory foo/bar but will ignore all changes to the content of that directory.
The option can be given multiple times. The option accepts a comma-delimited list: --watch-ignore a,b is equivalent to --watch-ignore a --watch-ignore b
# --fgrep <string>, -f <string>
BREAKING CHANGE in v6.0.0; now mutually exclusive with
--grep.
Cause Mocha to only run tests having titles containing the given string.
Mutually exclusive with --grep.
# --grep <regexp>, -g <regexp>
BREAKING CHANGE in v6.0.0; now mutually exclusive with
--fgrep.
Cause Mocha to only run tests matching the given regexp, which is internally compiled to a RegExp.
Suppose, for example, you have "api" related tests, as well as "app" related tests, as shown in the following snippet; One could use --grep api or --grep app to run one or the other. The same goes for any other part of a suite or test-case title, --grep users would be valid as well, or even --grep GET.
describe('api', function() {
  describe('GET /api/users', function() {
    it('respond with an array of users', function() {
      // ...
    });
  });
});

describe('app', function() {
  describe('GET /users', function() {
    it('respond with an array of users', function() {
      // ...
    });
  });
});
Mutually exclusive with --fgrep.
# --invert
Use the inverse of the match specified by --grep or fgrep.
Requires either --grep or --fgrep (but not both).
# --inspect, --inspect-brk, inspect
BREAKING CHANGE in v7.0.0;
--debug/--debug-brkare removed anddebugis deprecated.
Enables Node.js' inspector.
Use --inspect / --inspect-brk to launch the V8 inspector for use with Chrome Dev Tools.
Use inspect to launch Node.js' internal debugger.
All of these options are mutually exclusive.
Implies --no-timeout.
# About Option Types
Updated in v6.0.0.
Each flag annotated of type [boolean] in Mocha's --help output can be negated by prepending --no- to the flag name. For example, --no-color will disable Mocha's color output, which is enabled by default.
Unless otherwise noted, all boolean flags default to false.
# About node Flags
The mocha executable supports all applicable flags which the node executable supports.
These flags vary depending on your version of Node.js.
node flags can be defined in Mocha's configuration.
# About V8 Flags
Prepend --v8- to any flag listed in the output of node --v8-options (excluding --v8-options itself) to use it.
V8 flags can be defined in Mocha's configuration.
# Interfaces
Mocha's "interface" system allows developers to choose their style of DSL. Mocha has BDD, TDD, Exports, QUnit and Require-style interfaces.
# BDD
The BDD interface provides describe(), context(), it(), specify(), before(), after(), beforeEach(), and afterEach().
context() is just an alias for describe(), and behaves the same way; it just provides a way to keep tests easier to read and organized. Similarly, specify() is an alias for it().
All of the previous examples were written using the BDD interface.
describe('Array', function() {
  before(function() {
    // ...
  });

  describe('#indexOf()', function() {
    context('when not present', function() {
      it('should not throw an error', function() {
        (function() {
          [1, 2, 3].indexOf(4);
        }.should.not.throw());
      });
      it('should return -1', function() {
        [1, 2, 3].indexOf(4).should.equal(-1);
      });
    });
    context('when present', function() {
      it('should return the index where the element first appears in the array', function() {
        [1, 2, 3].indexOf(3).should.equal(2);
      });
    });
  });
});
# TDD
The TDD interface provides suite(), test(), suiteSetup(), suiteTeardown(), setup(), and teardown():
suite('Array', function() {
  setup(function() {
    // ...
  });

  suite('#indexOf()', function() {
    test('should return -1 when not present', function() {
      assert.equal(-1, [1, 2, 3].indexOf(4));
    });
  });
});
# Exports
The Exports interface is much like Mocha's predecessor expresso. The keys before, after, beforeEach, and afterEach are special-cased, object values are suites, and function values are test-cases:
module.exports = {
  before: function() {
    // ...
  },

  Array: {
    '#indexOf()': {
      'should return -1 when not present': function() {
        [1, 2, 3].indexOf(4).should.equal(-1);
      }
    }
  }
};
# QUnit
The QUnit-inspired interface matches the "flat" look of QUnit, where the test suite title is simply defined before the test-cases. Like TDD, it uses suite() and test(), but resembling BDD, it also contains before(), after(), beforeEach(), and afterEach().
function ok(expr, msg) {
  if (!expr) throw new Error(msg);
}

suite('Array');

test('#length', function() {
  var arr = [1, 2, 3];
  ok(arr.length == 3);
});

test('#indexOf()', function() {
  var arr = [1, 2, 3];
  ok(arr.indexOf(1) == 0);
  ok(arr.indexOf(2) == 1);
  ok(arr.indexOf(3) == 2);
});

suite('String');

test('#length', function() {
  ok('foo'.length == 3);
});
# Require
The require interface allows you to require the describe and friend words directly using require and call them whatever you want. This interface is also useful if you want to avoid global variables in your tests.
Note: The require interface cannot be run via the node executable, and must be run via mocha.
var testCase = require('mocha').describe;
var pre = require('mocha').before;
var assertions = require('mocha').it;
var assert = require('chai').assert;

testCase('Array', function() {
  pre(function() {
    // ...
  });

  testCase('#indexOf()', function() {
    assertions('should return -1 when not present', function() {
      assert.equal([1, 2, 3].indexOf(4), -1);
    });
  });
});
# Reporters
Mocha reporters adjust to the terminal window, and always disable ANSI-escape coloring when the stdio streams are not associated with a TTY.
# Spec
Alias: Spec, spec
This is the default reporter. The Spec reporter outputs a hierarchical view nested just as the test cases are.


# Dot Matrix
Alias: Dot, dot
The Dot Matrix reporter is simply a series of characters which represent test cases. Failures highlight in red exclamation marks (!), pending tests with a blue comma (,), and slow tests as yellow. Good if you prefer minimal output.

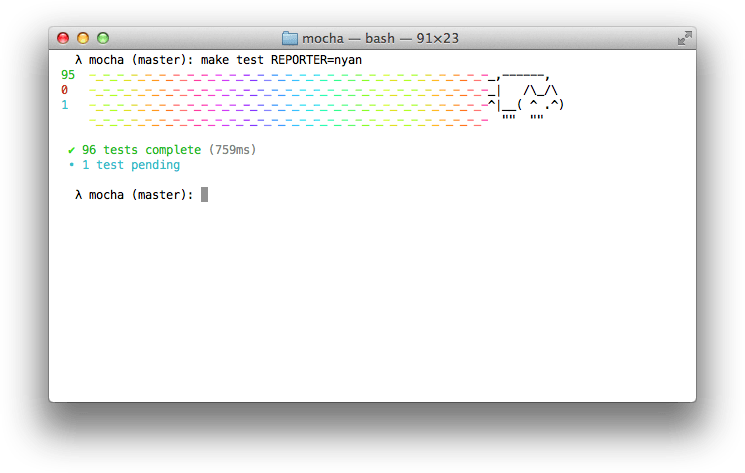
# Nyan
Alias: Nyan, nyan
The Nyan reporter is exactly what you might expect:
# TAP
Alias: TAP, tap
The TAP reporter emits lines for a Test-Anything-Protocol consumer.

# Landing Strip
Alias: Landing, landing
The Landing Strip reporter is a gimmicky test reporter simulating a plane landing :) unicode ftw


# List
Alias: List, list
The List reporter outputs a simple specifications list as test cases pass or fail, outputting the failure details at the bottom of the output.

# Progress
Alias: Progress, progress
The Progress reporter implements a simple progress-bar:

# JSON
Alias: JSON, json
The JSON reporter outputs a single large JSON object when the tests have completed (failures or not).

# JSON Stream
Alias: JSONStream, json-stream
The JSON Stream reporter outputs newline-delimited JSON "events" as they occur, beginning with a "start" event, followed by test passes or failures, and then the final "end" event.

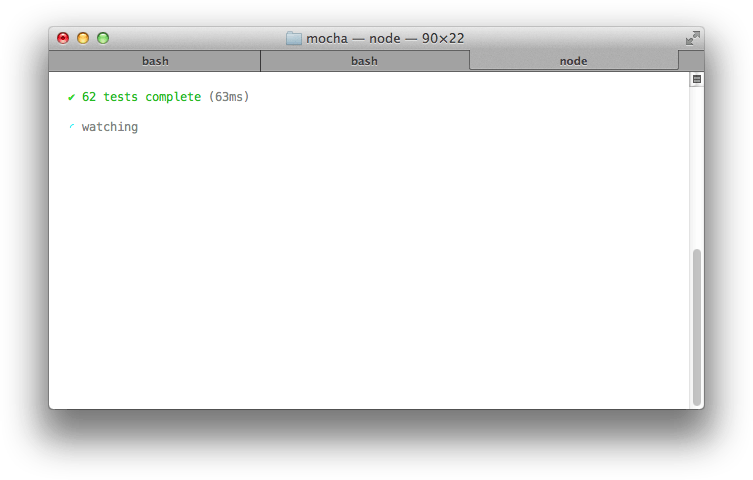
# Min
Alias: Min, min
The Min reporter displays the summary only, while still outputting errors on failure. This reporter works great with --watch as it clears the terminal in order to keep your test summary at the top.
# Doc
Alias: Doc, doc
The Doc reporter outputs a hierarchical HTML body representation of your tests. Wrap it with a header, footer, and some styling, then you have some fantastic documentation!

For example, suppose you have the following JavaScript:
describe('Array', function() {
  describe('#indexOf()', function() {
    it('should return -1 when the value is not present', function() {
      [1, 2, 3].indexOf(5).should.equal(-1);
      [1, 2, 3].indexOf(0).should.equal(-1);
    });
  });
});
The command mocha --reporter doc array would yield:
<section class="suite">
  <h1>Array</h1>
  <dl>
    <section class="suite">
      <h1>#indexOf()</h1>
      <dl>
        <dt>should return -1 when the value is not present</dt>
        <dd>
          <pre><code>[1,2,3].indexOf(5).should.equal(-1);
[1,2,3].indexOf(0).should.equal(-1);</code></pre>
        </dd>
      </dl>
    </section>
  </dl>
</section>
The SuperAgent request library test documentation was generated with Mocha's doc reporter using this Bash command:
$ mocha --reporter=doc | cat docs/head.html - docs/tail.html > docs/test.html
View SuperAgent's Makefile for reference.
# Markdown
Alias: Markdown, markdown
The Markdown reporter generates a markdown TOC and body for your test suite. This is great if you want to use the tests as documentation within a Github wiki page, or a markdown file in the repository that Github can render. For example, here is the Connect test output.
# XUnit
Alias: XUnit, xunit
The XUnit reporter is also available. It outputs an XUnit-compatible XML document, often applicable in CI servers.
By default, it will output to the console. To write directly to a file, use --reporter-option output=filename.xml.
To specify custom report title, use --reporter-option suiteName="Custom name".
# Third-Party Reporters
Mocha allows you to define custom reporters. For more information see the wiki.
Examples:
- the TeamCity reporter
- our working example
# HTML Reporter
Alias: HTML, html
The HTML reporter is not intended for use on the command-line.
# Running Mocha in the Browser
Mocha runs in the browser. Every release of Mocha will have new builds of ./mocha.js and ./mocha.css for use in the browser.
# Browser-specific methods
The following method(s) only function in a browser context:
mocha.allowUncaught() : If called, uncaught errors will not be absorbed by the error handler.
A typical setup might look something like the following, where we call mocha.setup('bdd') to use the BDD interface before loading the test scripts, running them onload with mocha.run().
<!DOCTYPE html>
<html lang="en">
  <head>
    <meta charset="utf-8" />
    <title>Mocha Tests</title>
    <meta name="viewport" content="width=device-width, initial-scale=1.0" />
    <link rel="stylesheet" href="https://unpkg.com/mocha/mocha.css" />
  </head>
  <body>
    <div id="mocha"></div>

    <script src="https://unpkg.com/chai/chai.js"></script>
    <script src="https://unpkg.com/mocha/mocha.js"></script>

    <script class="mocha-init">
      mocha.setup('bdd');
      mocha.checkLeaks();
    </script>
    <script src="test.array.js"></script>
    <script src="test.object.js"></script>
    <script src="test.xhr.js"></script>
    <script class="mocha-exec">
      mocha.run();
    </script>
  </body>
</html>
# Grep
The browser may use the --grep as functionality. Append a query-string to your URL: ?grep=api.
# Browser Configuration
Mocha options can be set via mocha.setup(). Examples:
// Use "tdd" interface.  This is a shortcut to setting the interface;
// any other options must be passed via an object.
mocha.setup('tdd');

// This is equivalent to the above.
mocha.setup({
  ui: 'tdd'
});

// Use "tdd" interface, check global leaks, and force all tests to be asynchronous
mocha.setup({
  ui: 'tdd',
  checkLeaks: true,
  asyncOnly: true
});
# Browser-specific Option(s)
Browser Mocha supports many, but not all cli options.
To use a cli option that contains a "-", please convert the option to camel-case, (eg. check-leaks to checkLeaks).
# Options that differ slightly from cli options:
reporter {string|constructor}
You can pass a reporter's name or a custom reporter's constructor. You can find recommended reporters for the browser here. It is possible to use built-in reporters as well. Their employment in browsers is neither recommended nor supported, open the console to see the test results.
# Options that only function in browser context:
noHighlighting {boolean}
If set to true, do not attempt to use syntax highlighting on output test code.
# Reporting
The "html" reporter is the default reporter when running Mocha in the browser. It looks like this:
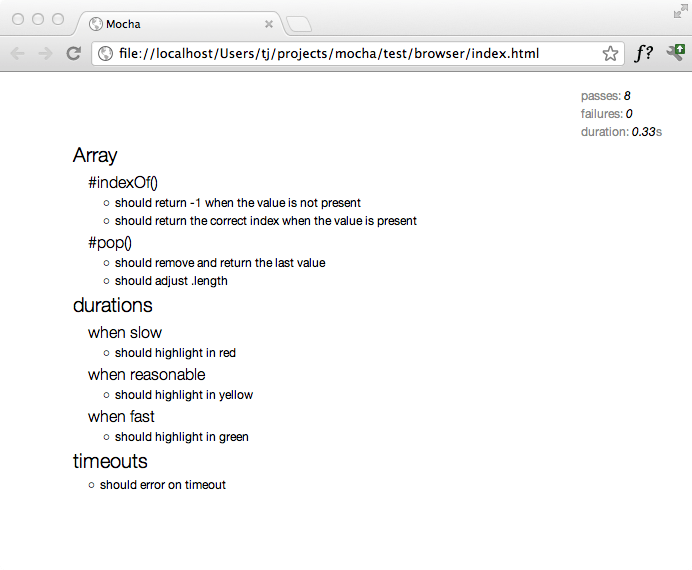
Mochawesome is a great alternative to the default HTML reporter.
# Desktop Notification Support
Desktop notifications allow asynchronous communication of events without forcing you to react to a notification immediately. Their appearance and specific functionality vary across platforms. They typically disappear automatically after a short delay, but their content is often stored in some manner that allows you to access past notifications.
Growl was an early notification system implementation for OS X and Windows, hence, the name of Mocha's --growl option.
Once enabled, when your root suite completes test execution, a desktop notification should appear informing you whether your tests passed or failed.
# Node-based notifications
In order to use desktop notifications with the command-line interface (CLI), you must first install some platform-specific prerequisite software. Instructions for doing so can be found here.
Enable Mocha's desktop notifications as follows:
$ mocha --growl
# Browser-based notifications
Web notification support is being made available for current versions of modern browsers. Ensure your browser version supports both promises and web notifications. As the Notification API evolved over time, do not expect the minimum possible browser version to necessarily work.
Enable Mocha's web notifications with a slight modification to your client-side mocha HTML. Add a call to mocha.growl() prior to running your tests as shown below:
<!DOCTYPE html>
<html lang="en">
  <head>
    <meta charset="utf-8" />
    <title>Mocha Tests</title>
    <meta name="viewport" content="width=device-width, initial-scale=1.0" />
    <link rel="stylesheet" href="https://unpkg.com/mocha/mocha.css" />
  </head>
  <body>
    <div id="mocha"></div>

    <script src="https://unpkg.com/chai/chai.js"></script>
    <script src="https://unpkg.com/mocha/mocha.js"></script>

    <script class="mocha-init">
      mocha.setup('bdd');
      mocha.growl(); // <-- Enables web notifications
    </script>
    <script src="test.spec.js"></script>
    <script class="mocha-exec">
      mocha.run();
    </script>
  </body>
</html>
# Configuring Mocha (Node.js)
New in v6.0.0
In addition to supporting the deprecated mocha.opts run-control format, Mocha now supports configuration files, typical of modern command-line tools, in several formats:
- JavaScript: Create a
.mocharc.jsin your project's root directory, and export an object (module.exports = {/* ... */}) containing your configuration. - YAML: Create a
.mocharc.yaml(or.mocharc.yml) in your project's root directory. - JSON: Create a
.mocharc.json(or.mocharc.jsonc) in your project's root directory. Comments — while not valid JSON — are allowed in this file, and will be ignored by Mocha. - package.json: Create a
mochaproperty in your project'spackage.json.
Mocha suggests using one of the above strategies for configuration instead of the deprecated mocha.opts format.
# Custom Locations
You can specify a custom location for your configuration file with the --config <path> option. Mocha will use the file's extension to determine how to parse the file, and will assume JSON if unknown.
You can specify a custom package.json location as well, using the --package <path> option.
# Ignoring Config Files
To skip looking for config files, use --no-config. Likewise, use --no-package to stop Mocha from looking for configuration in a package.json.
# Priorities
If no custom path was given, and if there are multiple configuration files in the same directory, Mocha will search for — and use — only one. The priority is:
.mocharc.js.mocharc.yaml.mocharc.yml.mocharc.jsonc.mocharc.json
# Merging
Mocha will also merge any options found in package.json and mocha.opts into its run-time configuration. In case of conflict, the priority is:
- Arguments specified on command-line
- Configuration file (
.mocharc.js,.mocharc.yml, etc.) mochaproperty ofpackage.jsonmocha.opts
Options which can safely be repeated (e.g., --require) will be concatenated, with higher-priorty configuration sources appearing earlier in the list. For example, a .mocharc.json containing "require": "bar", coupled with execution of mocha --require foo, would cause Mocha to require foo, then bar, in that order.
# Extending Configuration
Configurations can inherit from other modules using the extends keyword. See here for more information.
# Configuration Format
- Any "boolean" flag (which doesn't require a parameter, such as
--bail), can be specified using a boolean value, e.g.:"bail": true. - Any "array"-type option (see
mocha --helpfor a list) can be a single string value. - For options containing a dash (
-), the option name can be specified using camelCase. - Aliases are valid names, e.g.,
Rinstead ofreporter. - Test files can be specified using
spec, e.g.,"spec": "test/**/*.spec.js". - Flags to
nodeare also supported in configuration files, like inmocha.opts. Use caution, as these can vary between versions of Node.js!
For more configuration examples, see the example/config directory on GitHub.
# mocha.opts
mocha.optsfile support is DEPRECATED and will be removed from a future version of Mocha. We recommend using a configuration file instead.
Mocha will attempt to load "./test/mocha.opts" as a run-control file of sorts.
Beginning-of-line comment support is available; any line starting with a hash (#) symbol will be considered a comment. Blank lines may also be used. Any other line will be treated as a command-line argument (along with any associated option value) to be used as a default setting. Settings should be specified one per line.
The lines in this file are prepended to any actual command-line arguments. As such, actual command-line arguments will take precedence over the defaults.
For example, suppose you have the following mocha.opts file:
# mocha.opts
  --require should
  --reporter dot
  --ui bdd
The settings above will default the reporter to dot, require the should library, and use bdd as the interface. With this, you may then invoke mocha with additional arguments, here changing the reporter to list and setting the slow threshold to half a second:
$ mocha --reporter list --slow 500
To ignore your mocha.opts, use the --no-opts option.
# test/ 目录
By default, mocha looks for the glob "./test/*.js", so you may want to put your tests in test/ folder. If you want to include subdirectories, pass the --recursive option.
To configure where mocha looks for tests, you may pass your own glob:
$ mocha --recursive "./spec/*.js"
Some shells support recursive matching by using the globstar (**) wildcard. Bash >= 4.3 supports this with the globstar option which must be enabled to get the same results as passing the --recursive option (ZSH and Fish support this by default). With recursive matching enabled, the following is the same as passing --recursive:
$ mocha "./spec/**/*.js"
You should always quote your globs in npm scripts. If you use double quotes, it's the shell on UNIX that will expand the glob. On the other hand, if you use single quotes, the node-glob module will handle its expansion.
See this tutorial on using globs.
Note: Double quotes around the glob are recommended for portability.
# Error Codes
New in v6.0.0
When Mocha itself throws exception, the associated Error will have a code property. Where applicable, consumers should check the code property instead of string-matching against the message property. The following table describes these error codes:
| Code | Description |
|---|---|
| ERR_MOCHA_INVALID_ARG_TYPE | wrong type was passed for a given argument |
| ERR_MOCHA_INVALID_ARG_VALUE | invalid or unsupported value was passed for a given argument |
| ERR_MOCHA_INVALID_EXCEPTION | a falsy or otherwise underspecified exception was thrown |
| ERR_MOCHA_INVALID_INTERFACE | interface specified in options not found |
| ERR_MOCHA_INVALID_REPORTER | reporter specified in options not found |
| ERR_MOCHA_NO_FILES_MATCH_PATTERN | test file(s) could not be found |
| ERR_MOCHA_UNSUPPORTED | requested behavior, option, or parameter is unsupported |
# Editor Plugins
The following editor-related packages are available:
# TextMate
The Mocha TextMate bundle includes snippets to make writing tests quicker and more enjoyable.
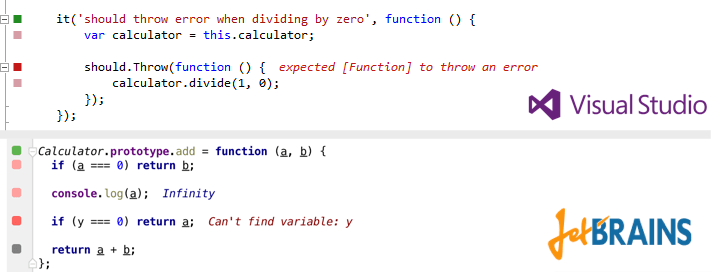
# JetBrains
JetBrains provides a NodeJS plugin for its suite of IDEs (IntelliJ IDEA, WebStorm, etc.), which contains a Mocha test runner, among other things.
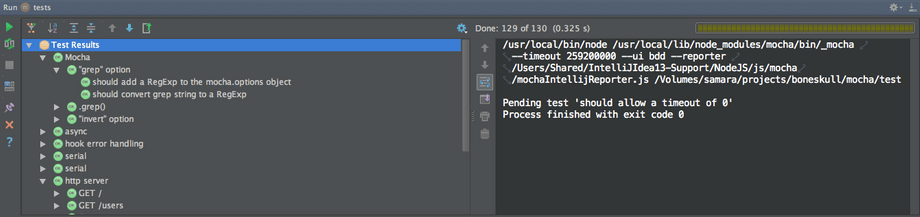
The plugin is titled NodeJS, and can be installed via Preferences > Plugins, assuming your license allows it.
# Wallaby.js
Wallaby.js is a continuous testing tool that enables real-time code coverage for Mocha with any assertion library in VS Code, Atom, JetBrains IDEs (IntelliJ IDEA, WebStorm, etc.), Sublime Text and Visual Studio for both browser and node.js projects.
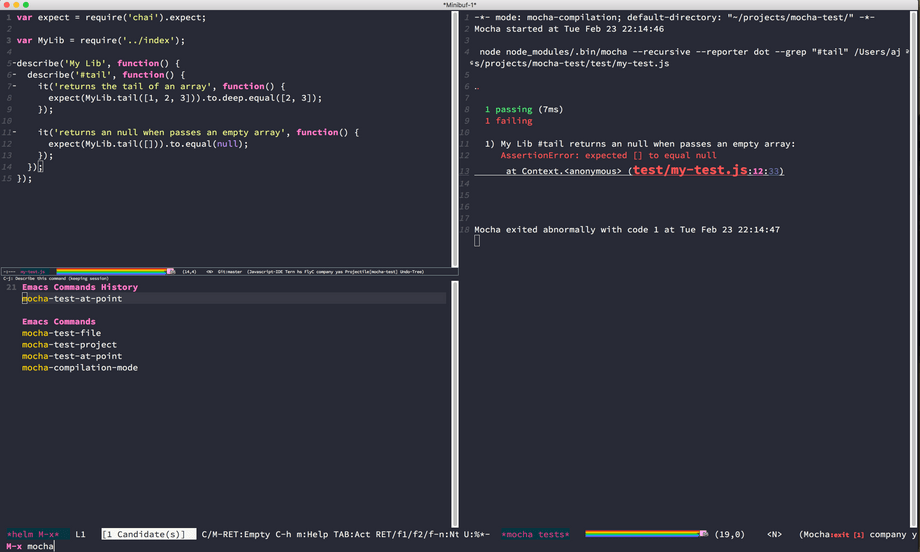
# Emacs
Emacs support for running Mocha tests is available via a 3rd party package mocha.el. The package is available on MELPA, and can be installed via M-x package-install mocha.
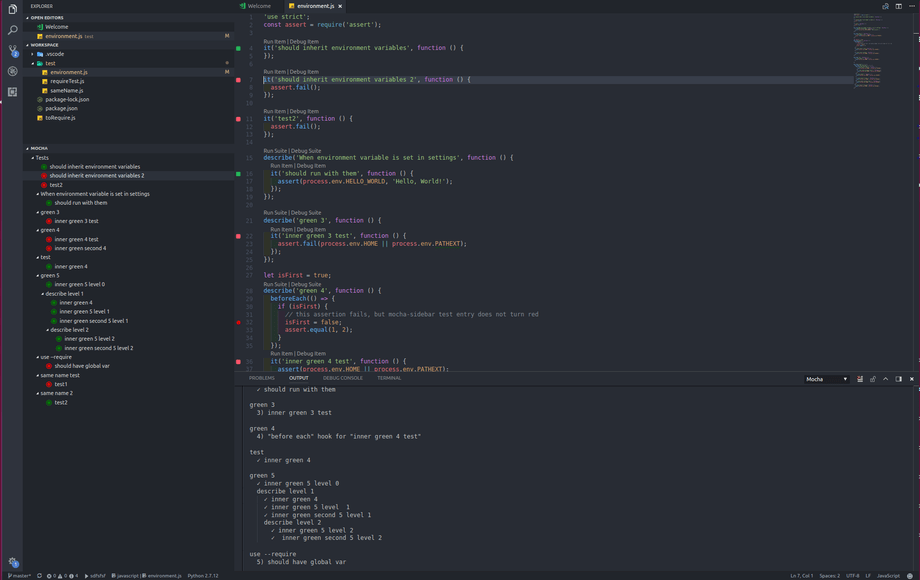
# Mocha Sidebar (VS Code)
Mocha sidebar is the most complete mocha extension for vs code.
# Features
- see all tests in VS Code sidebar menu
- run & debug tests for each level hierarchy from all tests to a single test (and each describe of course)
- auto run tests on file save
- see tests results directly in the code editor
# 实例
实例代码:
# 测试 Mocha
如需运行 Mocha 自身的测试,你需要安装 GNU Make 或兼容工具,例如 Cygwin。
$ cd /path/to/mocha
$ npm install
$ npm test
# 更多信息
In addition to chatting with us on Gitter, for additional information such as using spies, mocking, and shared behaviours be sure to check out the Mocha Wiki on GitHub. For discussions join the Google Group. For a running example of Mocha, view example/tests.html. For the JavaScript API, view the API documentation or the source.